|
Toshiba Satellite E105 disassembly.
|
|
|
 |
STEP 1
First of all, turn off the laptop, unplug the AC adapter and remove the battery.
In the following 6 steps I will be removing the keyboard.
Lift up the keyboard bezel with a small flathead screwdriver.
|
| |
|
 |
STEP 2
Remove two screws securing the keyboard.
|
| |
|
 |
STEP 3
Lift up the keyboard. |
| |
|
 |
STEP 4
Turn the keyboard over so you can access connectors on the motherboard.
The keyboard is connected to the motherboard via two flat ribbon cables.
As you see, both memory modules are located under the keyboard. |
| |
|
 |
STEP 5
Unlock both connectors by lifting the locking clips about 2 millimeters up.
After that release both cables and remove the keyboard.
|
| |
|
 |
STEP 6
On this picture you see both connectors unlocked.
|
| |
|
 |
STEP 7
Remove and replace memory modules if needed. This laptop can handle up to 4GB memory total. You can install up to 2GB memory module into each memory slot.
For this laptop you should use DDR2 PC6400 memory modules.
Remove one screw securing the DVD drive.
|
| |
|
 |
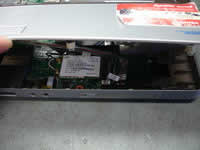
STEP 8
Push the DVD drive from the laptop with a small screwdriver.
Pull the DVD drive from the laptop and remove it.
|
| |
|
|
STEP 9
Remove all screws from the bottom of the laptop.
Screws in red circles are hidden under rubber covers. You can remove these covers with a sharp object. |
| |
|
 |
STEP 10
Remove three screws securing the top cover assembly.
Disconnect two cables.
|
| |
|
 |
STEP 11
Carefully separate the top cover assembly from the bottom assembly with a piece of soft plastic.
In my case I'm using a guitar pick.
|
| |
|
 |
STEP 12
Lift up the front side of the top cover and disconnect two cables. |
| |
|
 |
STEP 13
Now you can remove the top cover assembly. |
| |
|
 |
STEP 14
When the top cover assembly is removed you can access and replace the cooling fan, hard drive, wireless card and DC-IN power jack harness. |
| |
|
 |
STEP 15
Remove three screws securing the hard drive assembly.
|
| |
|
 |
STEP 16
Carefully lift up the hard drive and disconnect it from the motherboard. |
| |
|
 |
STEP 17
If you are replacing the hard drive, you'll have to remove the hard drive mounting bracket and transfer it to the new drive.
In my case the laptop came with a 320GB Toshiba SATA hard drive. You can easily replace it with a larger SATA hard drive. |
| |
|
|
|


